AI Technical Writer

Introduction
Lab reports are written for professionals and not patients. A value like WBC: 14,500 /uL or Hemoglobin: 9.1 g/dL is a meaningful number, but only if you know what white blood cell count and hemoglobin actually measure, and what the normal range is. Most people receive their results as a PDF, glance at the numbers, and have no real way to interpret them without scheduling a follow-up appointment.
Large language models are now good enough to close that gap. They can read a blood test report, identify values outside normal reference ranges, explain what those values mean in plain language, and flag which findings are significant enough to warrant a doctor’s attention. The challenge is doing this responsibly with a model that is grounded, avoids speculation, and never oversteps into diagnosis territory, and doing it privately, without routing sensitive health data through a shared, multi-tenant API.
In this tutorial, you will build a complete medical report analyzer from scratch using Python. The application accepts a blood test report uploaded as a PDF or a photo, extracts the text locally, and sends it to a Qwen3-8B model running on DigitalOcean Dedicated Inference. The model returns a structured analysis: a summary table of all detected values, plain-language explanations of anything flagged as abnormal, guidance on when to see a doctor, and actionable health practices relevant to the findings. By the end of this tutorial, you will have a working application and a clear understanding of how each piece — document extraction, prompt design, API integration, and UI — fits together into a production-ready LLM application.
Disclaimer: This application is for informational and educational purposes only. It explains blood test values, however it does not diagnose medical conditions. Always consult a qualified healthcare provider with your results.
Key Takeaways
- DigitalOcean Dedicated Inference provides dedicated GPU resources for deploying AI models with predictable performance.
- The application combines pdfplumber and Tesseract OCR to extract text from medical reports in both PDF and image formats.
- Running the application and inference endpoint within the same VPC can improve privacy by keeping sensitive data within a private network.
- Dedicated Inference is well-suited for healthcare-adjacent applications that require consistent performance and greater control over data handling.
- The architecture can be expanded to support additional healthcare workflows, document types, and AI-powered patient experiences.
- By combining OCR, large language models, and dedicated GPU infrastructure, developers can quickly build practical AI applications that transform complex medical reports into understandable insights.
Understanding DigitalOcean Dedicated Inference
Most developers building their first LLM-powered application reach for a shared API. You provision a key, call an endpoint, and receive tokens in return. For prototypes and low-volume use cases, that model works well. But once your application handles real users, especially when it processes sensitive data like medical reports, the trade-offs of shared infrastructure become harder to ignore.
Dedicated Inference is a fully managed service that runs AI models on dedicated GPUs. It gives control over the hardware, model settings, and performance that can be optimized for speed, scale, cost, or high request volumes. It’s best for applications with consistent and predictable usage.
Serverless Inference lets you call AI models through an API without managing any infrastructure. It’s ideal when you want to get started quickly, don’t need to host a custom model, or have unpredictable traffic that varies throughout the day.
Pricing is different for each option: Serverless Inference charges based on the number of tokens processed, while Dedicated Inference charges based on the GPU time used, regardless of the number of requests.
Under the hood, the service is built on vLLM — the widely adopted, high-throughput inference engine for LLMs on modern GPUs — and LLM-d, a Kubernetes-native stack engineered for the routing and scaling challenges that make LLM inference different from a conventional HTTP service.
Every request carries a prompt prefix, and if a model replica has already computed the attention state — the KV (key-value) cache — for that prefix, routing the next request to the same replica avoids redundant GPU computation. LLM-d’s inference-aware routing tracks KV cache affinity across replicas in real time and directs traffic accordingly, resulting in lower latency and better throughput under sustained load, without any additional configuration on your part.
Dedicated vs. Serverless Inference
DigitalOcean also offers Serverless Inference on the same platform. Serverless uses pay-per-token pricing and is the right starting point for bursty, exploratory, or low-volume workloads. Dedicated Inference is the right choice when three conditions apply: you need your own model running in isolated infrastructure, and when your application receives a steady stream of requests, making dedicated GPU resources more cost-effective than paying per token. It is also a good choice when your application requires stricter control over data privacy, compliance, or response times that shared infrastructure may not be able to guarantee.
We have already created a detailed article on Dedicated vs Serverless Inference, and we highly recommend our readers to check out the article.
For healthcare applications, keeping patient data private is critical. With Dedicated Inference, if your application and inference endpoint are deployed in the same private network (VPC), sensitive information such as lab report data stays within that private network and does not travel over the public internet. Since the model runs on dedicated GPUs instead of shared infrastructure, it offers an extra layer of privacy and control, making it a good choice for applications that handle sensitive health data.
Prerequisites
Before you begin, make sure you have the following in place:
- A DigitalOcean account with access to the AI Platform
- Python 3.10 or higher is installed on your machine
pipand familiarity with virtual environments (venvorconda)- Basic familiarity with Python and running commands in a terminal
Step 1 — Deploy Qwen3-8B on DigitalOcean Dedicated Inference
Step 1: Create a Dedicated Inference Endpoint
Log in to your DigitalOcean account and navigate to Dedicated Inference from the left-hand menu. Click Deploy Dedicated Inference to begin creating a new endpoint.
Step 2: Select a Datacenter Region
Choose the datacenter region where you want your inference endpoint to run. It is generally recommended to select a region that is geographically close to your application to minimize latency and improve response times.
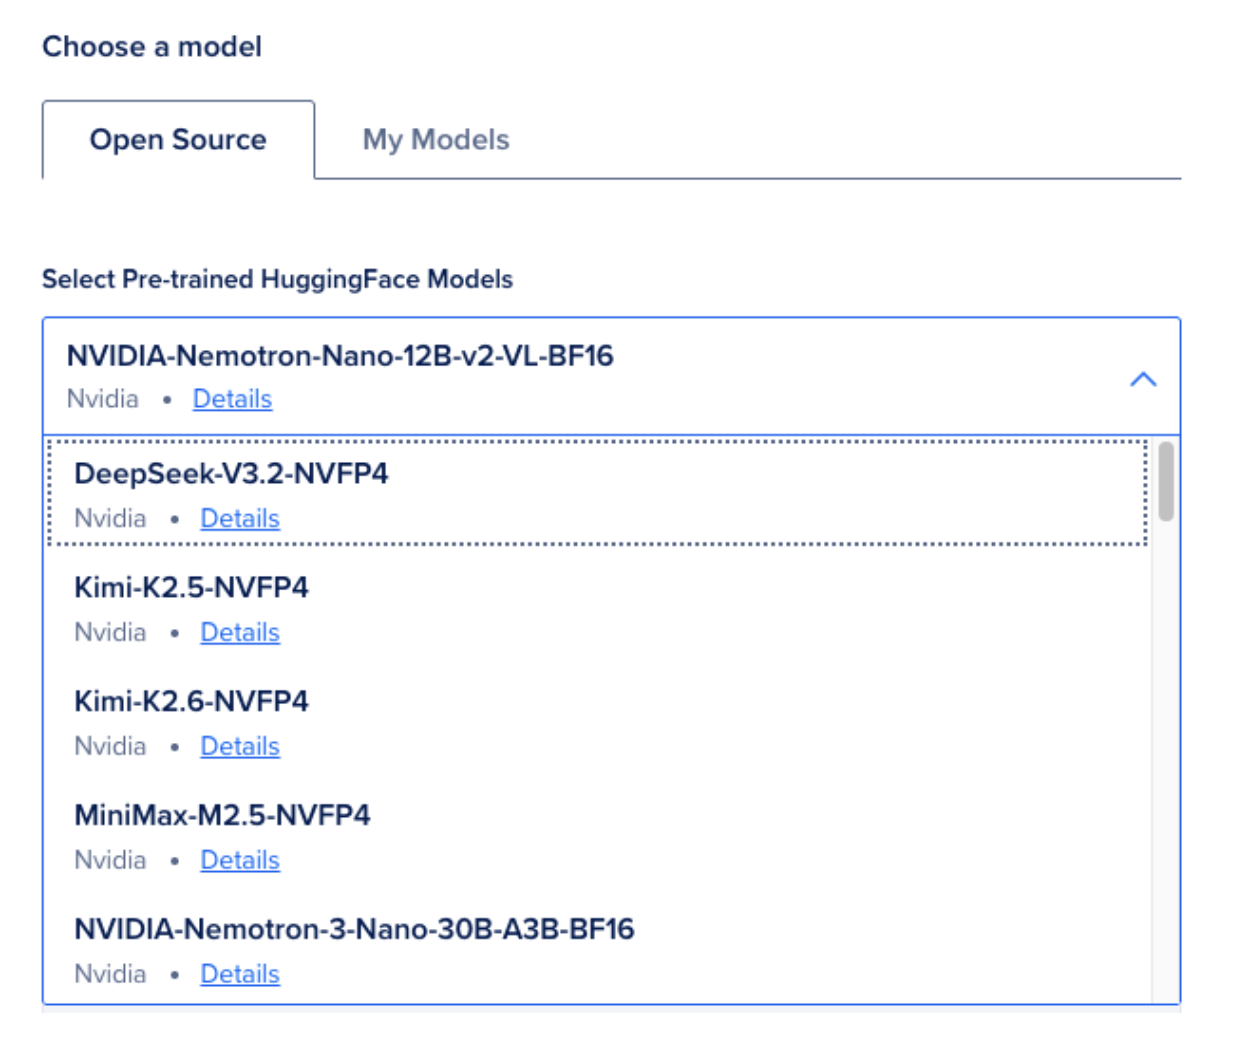
Step 3: Choose a Model
In the Choose a Model section, you have two options:
- Pre-trained Hugging Face Models – Select from a catalog of optimized models such as DeepSeek-V3.2-NVFP4 or Kimi-K2.5-NVFP4.
- My Models – Import your own model from:
- A Hugging Face repository
- A DigitalOcean Spaces bucket
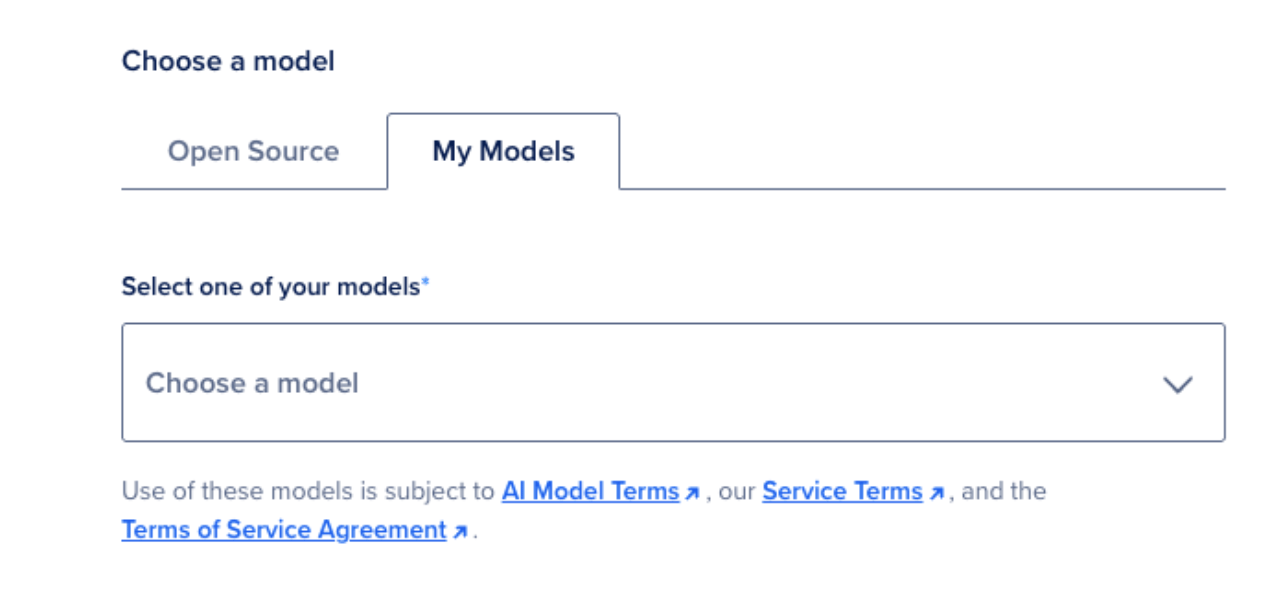
Step 4: Import the Qwen3-8B Model
For this project, select My Models and import the model Qwen3-8B from HuggingFace:
Qwen/Qwen3-8B
About Qwen3-8B
Qwen3-8B is an 8-billion-parameter open-source large language model developed by Alibaba Cloud. It provides a strong balance between performance and hardware efficiency, making it suitable for production applications that require high-quality reasoning and text generation without the infrastructure demands of much larger models.
Some key features of Qwen3-8B include:
- Strong performance across instruction-following, reasoning, and coding tasks.
- Multilingual support, including English, Chinese, and several other languages.
- Efficient deployment on dedicated GPU infrastructure.
- Suitable for chatbots, document analysis, content generation, and data extraction workflows.
For applications such as medical report analysis, Qwen3-8B offers enough reasoning capability to interpret laboratory values, identify abnormal results, and generate user-friendly summaries while remaining cost-effective to deploy on a dedicated inference endpoint.
Step 2 — Set Up the Project
Create a directory for the project and set up a Python virtual environment:
mkdir blood-test-analyzer
cd blood-test-analyzer
python3 -m venv venv
source venv/bin/activate       # On Windows: venv\Scripts\activate
The project uses four files:
blood-test-analyzer/
├── app.py           # Gradio UI and LLM analysis pipeline
├── extract.py       # PDF and image text extraction utilities
├── requirements.txt # Python dependencies
└── .env             # Credentials — never commit this to git
Create requirements.txt with the following content:
gradio>=4.20.0
pdfplumber>=0.10.0
pytesseract>=0.3.10
Pillow>=10.0.0
requests>=2.31.0
python-dotenv>=1.0.0
Install the dependencies:
pip install -r requirements.txt
Now, create your .env file with your credentials from Step 1:
# .env
DO_INFERENCE_TOKEN=your_token_here
DO_INFERENCE_URL=https://YOUR-ENDPOINT-URL/v1/chat/completions
MODEL_NAME=Qwen/Qwen3-8B
Never commit this file to a repository. Add .env to your .gitignore:
echo ".env" >> .gitignore
Why a .env file? Hardcoding credentials in source code is a common mistake that leads to accidental exposure in version control. The python-dotenv library loads these values into environment variables at runtime, keeping credentials out of your code entirely.
Step 3 — Extract Text from PDFs and Images (extract.py)
extract.py)The first challenge is getting readable text out of whatever the user uploads. Blood test reports come in two common formats: digital PDFs (where the text can be extracted directly) and photos or scans (where you need optical character recognition to read the text from the image).
Create extract.py:
"""
extract.py — Document text extraction utilities

Handles two input types:
  - PDF  : uses pdfplumber for reliable text extraction from digital PDFs
  - Image: uses pytesseract (Tesseract OCR) to read scanned/photographed reports

Tesseract installation:
  macOS  : brew install tesseract
  Ubuntu : sudo apt install tesseract-ocr
"""

import pdfplumber
import pytesseract
from PIL import Image


def extract_text_from_pdf(file_path: str) -> str:
    """Extract all text from a PDF file, page by page."""
    try:
        pages_text = []
        with pdfplumber.open(file_path) as pdf:
            for page in pdf.pages:
                text = page.extract_text()
                if text:
                    pages_text.append(text)

        if not pages_text:
            return (
                "Could not extract any text from this PDF. "
                "It may be a scanned image — try uploading it as an image instead."
            )

        return "\n\n".join(pages_text)

    except Exception as e:
        return f"PDF extraction error: {str(e)}"


def extract_text_from_image(file_path: str) -> str:
    """Run OCR on a photo or scan of a blood test report."""
    try:
        image = Image.open(file_path)
        custom_config = r"--oem 3 --psm 6"
        text = pytesseract.image_to_string(image, config=custom_config)

        if not text.strip():
            return (
                "OCR could not extract text from this image. "
                "Please ensure the image is clear and well-lit."
            )

        return text

    except Exception as e:
        return f"Image OCR error: {str(e)}"


def extract_text(file_path: str) -> str:
    """Route a file to the correct extraction function based on its extension."""
    if file_path is None:
        return ""

    lower = file_path.lower()

    if lower.endswith(".pdf"):
        return extract_text_from_pdf(file_path)

    elif lower.endswith((".png", ".jpg", ".jpeg", ".tiff", ".tif", ".bmp", ".webp")):
        return extract_text_from_image(file_path)

    else:
        return "Unsupported file type. Please upload a PDF or an image file (JPG, PNG, etc.)."
Code Walkthrough: Why These Libraries?
pdfplumber over PyPDF2: Lab report PDFs often have multi-column layouts or tables. pdfplumber is built specifically to handle these layouts; it can extract text from individual cells, preserve whitespace, and work with PDFs that PyPDF2 misreads.
pytesseract + Pillow: pytesseract is a Python wrapper around the Tesseract OCR engine, one of the most accurate open-source OCR systems available. Pillow handles loading the image into memory in a format Tesseract can process.
The --psm 6 Tesseract flag: PSM stands for Page Segmentation Mode. Mode 6 tells Tesseract to treat the input as a single uniform block of text, which suits lab reports well — they are structured documents with consistent formatting rather than mixed-layout pages like newspapers or invoices. --oem 3 tells Tesseract to use the best available OCR engine, defaulting to the neural network-based LSTM engine.
The extract_text() dispatcher: Rather than having app.py make decisions about file types, all routing logic lives in one place. app.py calls extract_text(path) and gets back a string regardless of what was uploaded. This makes the extraction layer easy to extend — adding support for a new file type only requires a change in extract.py.
Step 4 — Design the System Prompt
Before building the analysis logic, it is worth spending time on the system prompt. For an LLM application, the system prompt is the most important engineering decision you will make. It determines whether the model’s output is structured enough to display, safe enough to ship, and useful enough to trust.
For a medical report analyzer, three things must be true of every response:
- The output format must be predictable — the Gradio UI needs to render the same structure every time, not whatever the model decides to produce on a given request.
- The language must be responsible — the model must explain values and flag concerns without diagnosing conditions, which requires explicit guardrails in the prompt.
- The content must be actionable — the analysis should tell the user what to do next, not just what the numbers mean in isolation.
Here is the system prompt used in this application:
SYSTEM_PROMPT = """
You are a clinical blood test analysis assistant. Your job is to read extracted text
from a blood test report and explain what the results mean in plain language.

Strict rules:
- You do NOT diagnose diseases or medical conditions.
- You DO explain what each abnormal value means and its possible general causes.
- You DO flag values that are outside normal reference ranges.
- You DO recommend consulting a physician when findings are significant.
- You are factual, calm, and easy to understand.

Always respond using the following exact markdown structure. Do not skip any section.

---

## 🔬 Blood Test Summary

List every biomarker you detected in the report as a markdown table with these columns:
| Biomarker | Patient Value | Normal Range | Status |

Use ✅ for normal, ⚠️ for mildly abnormal, and 🔴 for significantly abnormal in the
Status column. If you cannot detect a specific normal range from the report, use widely
accepted adult reference ranges.

---

## ⚠️ Concerning Findings

For each flagged value (⚠️ or 🔴), write a short paragraph explaining:
- What this biomarker measures
- What a high or low value generally indicates
- Why it matters for overall health

Do not diagnose. Use phrases like "may suggest", "can be associated with", or
"warrants further evaluation."

If all values are normal, write: "All detected values are within normal ranges.
No concerning findings identified."

---

## 🏥 When to See a Doctor

Based on the flagged findings, clearly state:
- Whether this report requires urgent medical attention (yes / no / monitor)
- Which specific findings are most important to discuss with a physician and why
- Any combination of abnormal values that together may indicate something noteworthy

Keep this section direct and practical.

---

## 💚 Routine Health Practices

Suggest 4–6 evidence-based lifestyle practices relevant to the flagged findings. These
should be actionable and specific (e.g., "Eat iron-rich foods like lentils and leafy
greens" not just "eat healthy"), paired with a one-line explanation of why they help,
and clearly framed as general wellness advice, not treatment.

Format as a numbered list.

---

End your response after the health practices section.
"""
Why This Prompt Works
The “strict rules” block comes before any output instructions. This is intentional as the model reads system prompts top to bottom, and safety constraints defined early are more consistently applied than those buried inside formatting instructions.
The explicit section headers with emoji serve two purposes. They make the model’s output immediately scannable for human readers, and they give the Gradio gr.Markdown component clear anchors to render as formatted sections. Because the prompt tells the model to use exact markdown structure, the output is consistent across requests.
temperature: 0.1 is set at the API call level, not in the prompt, but it works in concert with the prompt’s structure requirement. Low temperature makes the model more deterministic as it is less likely to rephrase section headers, reorder sections, or invent formatting variations. For a medical tool where output consistency is a correctness requirement, this is as important as the prompt itself.
Language like “may suggest” and “warrants further evaluation” is specified explicitly. Without this instruction, instruction-tuned models sometimes speak with more certainty than the evidence warrants. Making the hedging explicit keeps every response in the right register — informative without overstepping.
Step 5 — Build the Analysis Pipeline and Gradio App (app.py)
app.py)Now bring everything together. Create app.py:
"""
app.py — Blood Test Analyzer
------------------------------
A Gradio web application that accepts a blood test report (PDF or image),
extracts the text, and sends it to Qwen3-8B on DigitalOcean Dedicated Inference.
"""
import os
import requests
import gradio as gr
from dotenv import load_dotenv
from extract import extract_text
load_dotenv()
# ---------------------------------------------------------------------------
# Configuration — loaded from .env
# ---------------------------------------------------------------------------
INFERENCE_URL = os.getenv("DO_INFERENCE_URL", "")
API_TOKEN = os.getenv("DO_INFERENCE_TOKEN", "")
MODEL_NAME = os.getenv("MODEL_NAME", "Qwen/Qwen3-8B")
# ---------------------------------------------------------------------------
# System prompt (see Step 4)
# ---------------------------------------------------------------------------
SYSTEM_PROMPT = """
You are a clinical blood test analysis assistant. Your job is to read extracted text
from a blood test report and explain what the results mean in plain language.
Strict rules:
- You do NOT diagnose diseases or medical conditions.
- You DO explain what each abnormal value means and its possible general causes.
- You DO flag values that are outside normal reference ranges.
- You DO recommend consulting a physician when findings are significant.
- You are factual, calm, and easy to understand.
Always respond using the following exact markdown structure. Do not skip any section.
---
## 🔬 Blood Test Summary
List every biomarker you detected in the report as a markdown table with these columns:
| Biomarker | Patient Value | Normal Range | Status |
Use ✅ for normal, ⚠️ for mildly abnormal, and 🔴 for significantly abnormal in the
Status column. If you cannot detect a specific normal range from the report, use widely
accepted adult reference ranges.
---
## ⚠️ Concerning Findings
For each flagged value (⚠️ or 🔴), write a short paragraph explaining:
- What this biomarker measures
- What a high or low value generally indicates
- Why it matters for overall health
Do not diagnose. Use phrases like "may suggest", "can be associated with", or
"warrants further evaluation."
If all values are normal, write: "All detected values are within normal ranges.
No concerning findings identified."
---
## 🏥 When to See a Doctor
Based on the flagged findings, clearly state:
- Whether this report requires urgent medical attention (yes / no / monitor)
- Which specific findings are most important to discuss with a physician and why
- Any combination of abnormal values that together may indicate something noteworthy
Keep this section direct and practical.
---
## 💚 Routine Health Practices
Suggest 4–6 evidence-based lifestyle practices relevant to the flagged findings. These
should be actionable and specific, paired with a one-line explanation of why they help,
and clearly framed as general wellness advice, not treatment.
Format as a numbered list.
---
End your response after the health practices section.
"""
# ---------------------------------------------------------------------------
# LLM analysis
# ---------------------------------------------------------------------------
def analyze_report(extracted_text: str) -> str:
"""Send extracted blood test text to the model and return the analysis."""
if not API_TOKEN:
return "❌ **Configuration error:** `DO_INFERENCE_TOKEN` is not set in your `.env` file."
if not extracted_text or not extracted_text.strip():
return "❌ No text could be extracted from the uploaded file."
headers = {
"Authorization": f"Bearer {API_TOKEN}",
"Content-Type": "application/json",
}
payload = {
"model": MODEL_NAME,
"messages": [
{"role": "system", "content": SYSTEM_PROMPT},
{"role": "user", "content": f"Here is the blood test report text:\n\n{extracted_text}"}
],
"temperature": 0.1,
"max_tokens": 2000,
}
try:
response = requests.post(INFERENCE_URL, headers=headers, json=payload, timeout=60)
response.raise_for_status()
return response.json()["choices"][0]["message"]["content"]
except requests.exceptions.Timeout:
return "❌ **Request timed out.** The inference endpoint took too long to respond. Please try again."
except requests.exceptions.HTTPError as e:
status = e.response.status_code
if status == 401:
return "❌ **Authentication failed.** Check that your `DO_INFERENCE_TOKEN` is correct."
elif status == 429:
return "❌ **Rate limit hit.** Wait a moment and try again."
else:
return f"❌ **HTTP error {status}:** {e.response.text}"
except Exception as e:
return f"❌ **Unexpected error:** {str(e)}"
# ---------------------------------------------------------------------------
# Pipeline: upload → extract → analyze
# ---------------------------------------------------------------------------
def process_report(file_path: str) -> tuple[str, str]:
"""Full pipeline: extract text from file, send to model, return analysis."""
if file_path is None:
return "", "Please upload a blood test report to get started."
extracted = extract_text(file_path)
# Catch extraction errors before making an API call
error_prefixes = (
"Could not extract", "OCR could not", "PDF extraction error",
"Image OCR error", "Unsupported"
)
if any(extracted.startswith(p) for p in error_prefixes):
return extracted, f"❌ **Extraction failed:** {extracted}"
analysis = analyze_report(extracted)
return extracted, analysis
# ---------------------------------------------------------------------------
# Gradio UI
# ---------------------------------------------------------------------------
def build_ui() -> gr.Blocks:
with gr.Blocks(title="Blood Test Analyzer", theme=gr.themes.Soft()) as app:
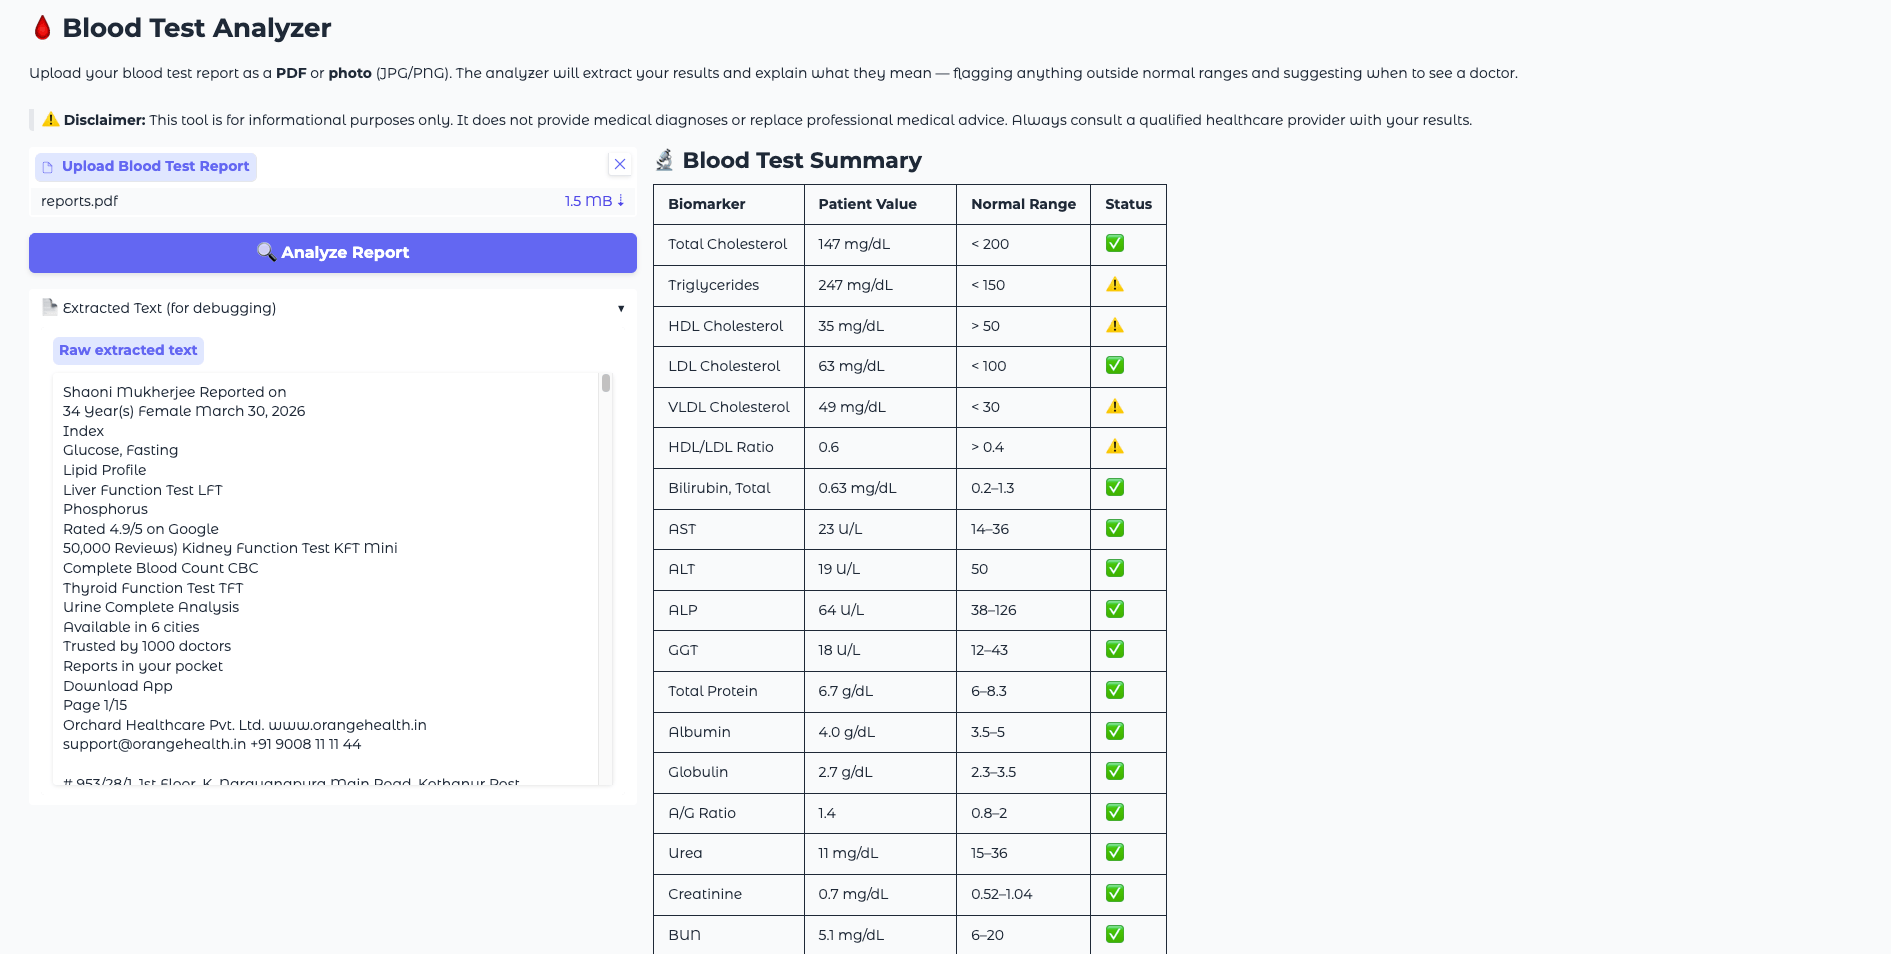
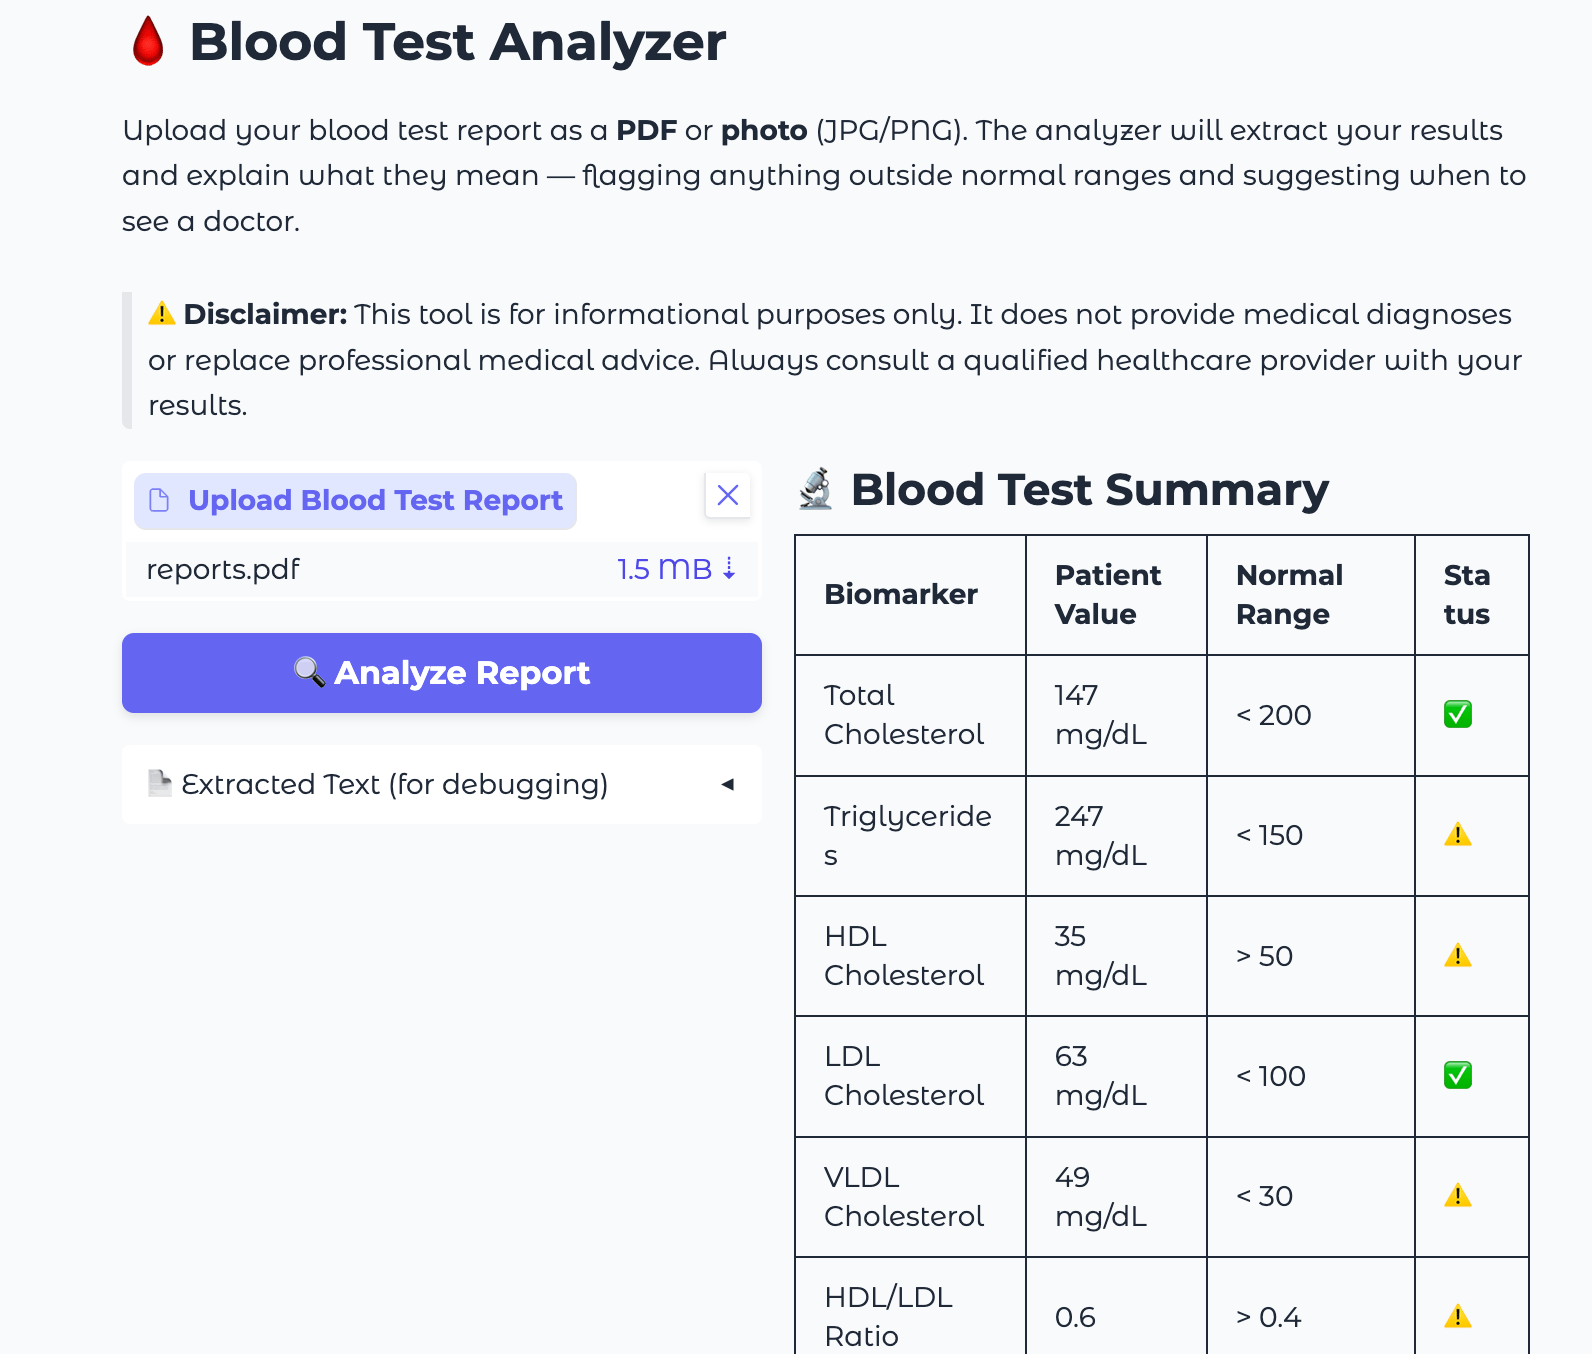
gr.Markdown("""
# 🩸 Blood Test Analyzer
Upload your blood test report as a **PDF** or **photo** (JPG/PNG).
The analyzer extracts your results and explains what they mean — flagging anything
outside normal ranges and suggesting when to see a doctor.
> ⚠️ **Disclaimer:** This tool is for informational purposes only. It does not
> provide medical diagnoses or replace professional medical advice.
""")
with gr.Row():
with gr.Column(scale=1):
file_input = gr.File(
label="Upload Blood Test Report",
file_types=[".pdf", ".jpg", ".jpeg", ".png", ".tiff", ".bmp", ".webp"],
type="filepath",
)
analyze_btn = gr.Button("🔍 Analyze Report", variant="primary", size="lg")
with gr.Accordion("📄 Extracted Text (debug)", open=False):
extracted_output = gr.Textbox(
label="Raw extracted text",
lines=12,
interactive=False,
)
with gr.Column(scale=2):
analysis_output = gr.Markdown(
value="Your analysis will appear here after you upload a report and click **Analyze Report**."
)
analyze_btn.click(
fn=process_report,
inputs=[file_input],
outputs=[extracted_output, analysis_output],
show_progress="full",
)
gr.Markdown("""
---
Built with [Gradio](https://gradio.app) · Powered by Qwen3-8B on
[DigitalOcean Dedicated Inference](https://docs.digitalocean.com/products/gen-ai-platform/)
""")
return app
if __name__ == "__main__":
ui = build_ui()
ui.launch(
server_name="0.0.0.0",
server_port=7860,
share=False,
)
Code Walkthrough: Key Decisions Explained
Loading credentials with dotenv
load_dotenv()
INFERENCE_URL = os.getenv("DO_INFERENCE_URL", "")
API_TOKEN     = os.getenv("DO_INFERENCE_TOKEN", "")
load_dotenv() reads your .env file and adds its contents into the process environment. os.getenv() then reads those values. The empty string defaults mean the app starts without crashing if the file is missing — instead, the analyze_report() function catches the empty token and returns a clear error message rather than a silent failure.
Building the API request
payload = {
    "model": MODEL_NAME,
    "messages": [
        {"role": "system", "content": SYSTEM_PROMPT},
        {"role": "user",   "content": f"Here is the blood test report text:\n\n{extracted_text}"}
    ],
    "temperature": 0.1,
    "max_tokens": 2000,
}
The DigitalOcean Dedicated Inference endpoint is OpenAI-compatible, which means the request format is the same messages array you would use with any OpenAI client. The system role sets the model’s behavior for the entire conversation. The user role contains the actual report text that the model should analyze.
max_tokens: 2000 gives the model enough room to produce all four sections with detail. Cutting this too low results in truncated responses — the health practices section is typically the last to be generated and the first to be cut off.
The three-step pipeline
def process_report(file_path: str) -> tuple[str, str]:
    extracted = extract_text(file_path)

    if any(extracted.startswith(p) for p in error_prefixes):
        return extracted, f"❌ Extraction failed: {extracted}"

    analysis = analyze_report(extracted)
    return extracted, analysis
The pipeline is deliberately sequential and validates between each step. If extraction fails, the function returns early without making an API call — no wasted GPU time, no confusing model output for an empty input. The function returns two values: the raw extracted text (shown in the debug accordion) and the analysis (shown in the main output panel). This makes debugging OCR quality easy without cluttering the main interface.
Step 6 — Run and Test the Application
With all files in place, start the app:
python app.py
Open http://localhost:7860 in your browser. You should see the Blood Test Analyzer interface with an upload area on the left and a blank analysis panel on the right.
To test the full pipeline, you can create a simple text file with sample blood test values and save it as a PDF, or photograph a printed report. Use these sample values to verify the model’s output matches what you expect:
Hemoglobin: 9.1 g/dL
WBC: 14500 /uL
Platelets: 420000 /uL
A correctly functioning analyzer should flag Hemoglobin as significantly low (🔴), WBC as elevated (⚠️ to 🔴 depending on the reference range used), and Platelets as mildly high (⚠️), explain what each of these means, recommend physician follow-up, and suggest relevant practices like iron-rich foods and hydration.
If the extracted text accordion shows garbled output for an image upload, check that Tesseract is installed correctly (tesseract --version in your terminal) and that the image is well-lit and not blurry. OCR works best on images that are at least 300 DPI equivalent resolution and captured straight-on rather than at an angle.
Step 7 — Deploy to DigitalOcean
Once your application is ready, you can deploy it on DigitalOcean to create a production-ready environment for analyzing blood test reports. Using Dedicated Inference ensures that sensitive health-related data is processed on dedicated compute resources rather than a shared inference pool. Combined with private networking and predictable performance, this makes it a strong choice for applications that handle personal medical information.
To deploy the application:
- Push your code to a GitHub repository.
- Create a new App Platform application and connect your repository.
- Configure the required environment variables, including your Dedicated Inference endpoint and API credentials.
- Deploy the application and verify that file uploads and report analysis are functioning correctly.
- (Optional) Connect a custom domain and enable HTTPS for a production-ready user experience.
To understand the step-by-step procedure, feel free to check out the detailed article on Build and Deploy Apps on DigitalOcean App Platform with Custom Domain.
With the application deployed, users can securely upload blood test reports, extract key health metrics, and receive AI-powered insights within minutes.
FAQs
1. What is DigitalOcean Dedicated Inference?
DigitalOcean Dedicated Inference is a managed service that allows you to deploy and serve AI models on dedicated GPU infrastructure. Unlike shared inference services, the GPU resources are reserved for your workload, providing predictable performance, greater control, and improved privacy.
2. Why use Dedicated Inference instead of Serverless Inference?
Dedicated Inference is a better choice when you have consistent inference traffic, need predictable latency, require dedicated GPU resources, or must meet privacy and compliance requirements. Serverless Inference is often more suitable for variable or low-volume workloads.
3. Why was Qwen3-8B chosen for this project?
Qwen3-8B offers a strong balance between model quality and deployment cost. It can understand and analyze medical report text effectively while remaining efficient enough for production deployments on dedicated GPU infrastructure.
4. Can the application analyze both PDFs and images?
Yes. The application supports PDF files and image uploads. PDF text is extracted using pdfplumber, while image-based reports are processed using Tesseract OCR before being sent to the language model for analysis.
5. Is patient data sent over the public internet?
If the application and Dedicated Inference endpoint are deployed within the same VPC and use private networking, the data can remain within the private network, reducing exposure to the public internet.
6. Can I use a different language model?
Yes. Dedicated Inference supports importing your own models from Hugging Face repositories or DigitalOcean Spaces. You can replace Qwen3-8B with another compatible model based on your requirements.
7. Is this application intended to replace medical professionals?
No. The application is designed to help users better understand their reports by generating simplified explanations. It should not be considered a substitute for professional medical advice, diagnosis, or treatment.
8. How can this project be extended?
You can add support for additional medical documents, integrate patient history, build trend analysis across multiple reports, implement authentication, store reports in a database, or create a conversational health assistant for follow-up questions.
Conclusion
Pat yourself on the back! You have successfully built a complete medical report analyzer. The application accepts blood test PDFs and images, extracts text using pdfplumber and Tesseract OCR, and sends the extracted content to a Qwen3-8B model running on DigitalOcean Dedicated Inference to generate an easy-to-understand analysis of the results.
This is just the beginning. You can further enhance the application by adding support for additional medical documents, integrating patient history for more personalized insights, implementing user authentication, storing reports in a database, generating trend analysis across multiple reports, and even building a conversational assistant that allows users to ask follow-up questions about their health data. With Dedicated Inference providing consistent performance and greater control over sensitive data, you have a solid foundation for building more advanced healthcare AI applications.
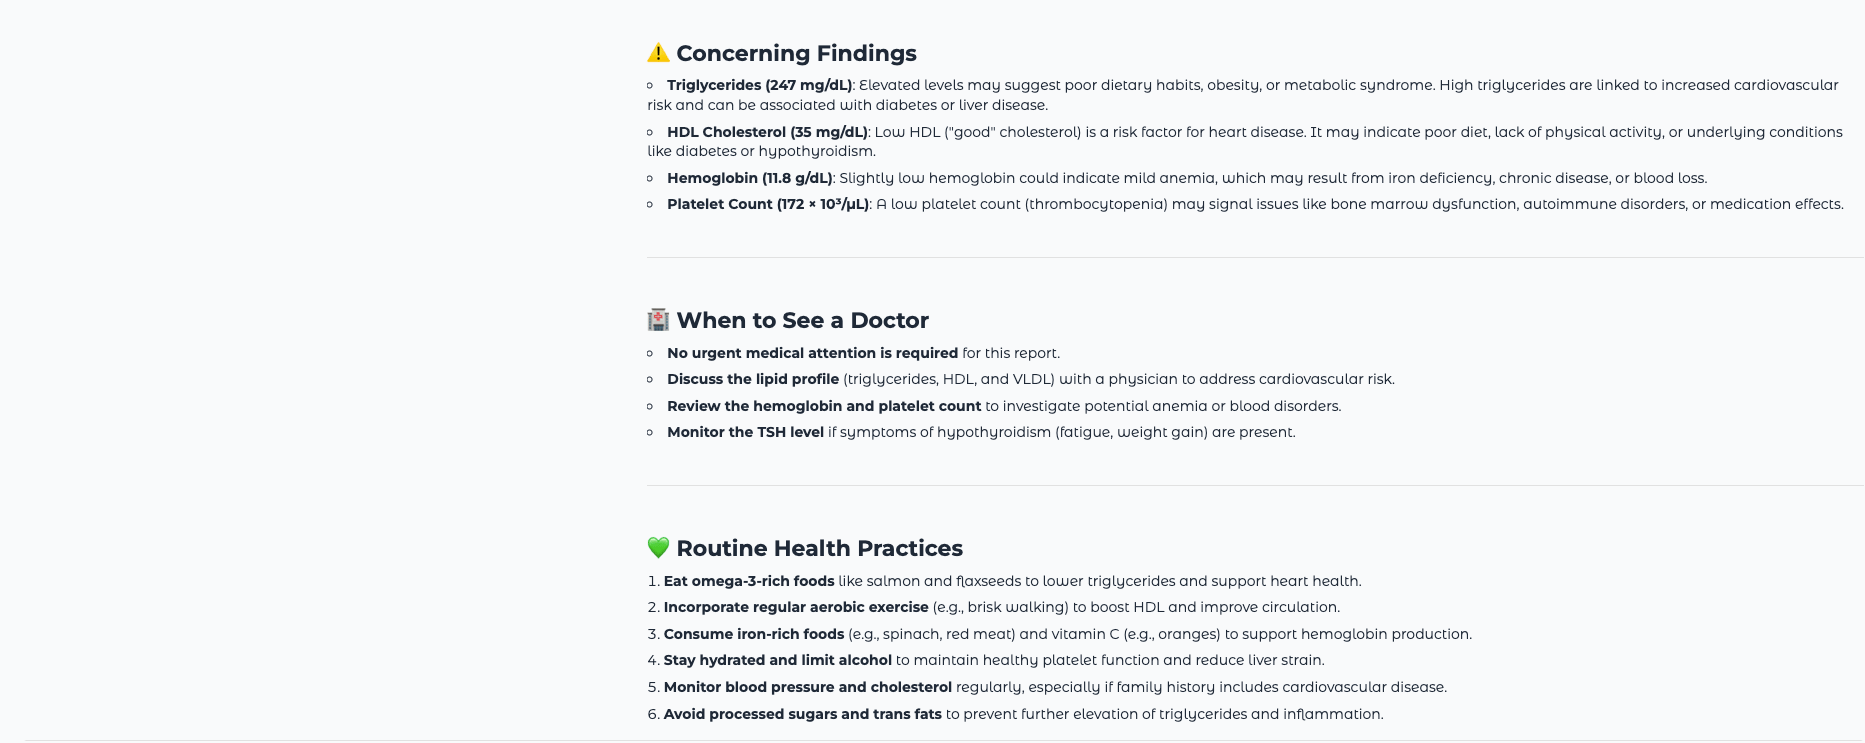
The model returns a structured four-section analysis that explains flagged values in plain language, assesses urgency, and suggests actionable health practices.
Local text extraction means the file itself never leaves the user’s session, but only the extracted text goes to the inference endpoint. A structured system prompt with explicit safety guardrails ensures the model’s output is consistently formatted and never oversteps into diagnosis territory. Low-temperature generation keeps that output predictable across requests. And Dedicated Inference means the entire analysis pipeline runs on infrastructure you own, with data isolation guaranteed by architecture rather than policy.
From here, there are a few further steps that can be taken to take this app to the next level. One of them is swapping in a vision model, Qwen3-VL, for example, would let the app skip OCR entirely and process image reports natively, which improves accuracy on low-quality scans. Adding a history panel so users can compare reports across multiple dates would turn a one-off analysis tool into something genuinely useful for tracking health trends over time. Adding authentication before deploying to real users is the right step before this touches anyone’s actual health data.
Thanks for learning with the DigitalOcean Community. Check out our offerings for compute, storage, networking, and managed databases.
About the author
With a strong background in data science and over six years of experience, I am passionate about creating in-depth content on technologies. Currently focused on AI, machine learning, and GPU computing, working on topics ranging from deep learning frameworks to optimizing GPU-based workloads.
Still looking for an answer?
 This work is licensed under a Creative Commons Attribution-NonCommercial- ShareAlike 4.0 International License.
Become a contributor for community
Get paid to write technical tutorials and select a tech-focused charity to receive a matching donation.

DigitalOcean Documentation
Full documentation for every DigitalOcean product.

Resources for startups and AI-native businesses
The Wave has everything you need to know about building a business, from raising funding to marketing your product.
The developer cloud
Scale up as you grow — whether you're running one virtual machine or ten thousand.

Start building today
From GPU-powered inference and Kubernetes to managed databases and storage, get everything you need to build, scale, and deploy intelligent applications.
